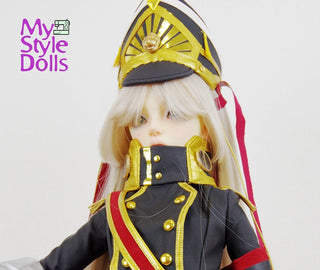
Costume production target doll body: Super Dollfie <SD> (height approximately 54cm)
Items produced through this commissioned production service: 1. Military dress 2. Military cap (decorative item)
③ Arm parts (decorative items)
④ Gloves (decorative items)
⑤ Belt (decorative item)
⑥ Pouch (decorative item)
⑦ Boots (decorative item)
 The customer requested that we use a "glossy material," so we chose this fabric.
First, we will start by making the skirt part of the military dress.
The skirt part is finished.
First, create the part that will overlap the skirt and the sleeves using temporary fabric, then determine the shape and take the measurements.
We will make it using the actual fabric based on the shape and dimensions of the temporary fabric.
The symbol mark on the front is digitized on a computer while looking at the picture, and then cut out with a cutting machine.
There is a symbol mark and button on the front.
Now let's make the decoration for the left arm.
Now let's make the decorations on both shoulders.
Now let's make the sash part.
Attach the neck parts and the military dress is complete.
Next, we will make a military cap.
We will create the symbolic part like a lion's face that is attached to the center of the front of the military cap.
Once the shape is complete, paint it gold.
We will make the decorations on both sides of the military cap.
After attaching each part, the military cap is complete.
Next, we will make the belt.
The main body of the belt is now complete.
Let's make a pouch that is attached to the belt.
Thread the pouch onto your belt.
This is what the pouch looks like when attached to your waist.
The gloves are finished.
Next, we will make the arm parts.
The parts cut out one by one from the material are pasted on.
We will work on the finer details.
Paint it silver and it's done.
When you attach the gloves and arm parts to the doll, it will look like this.
Next, we will make the boots.
Let's make the shoe part.
Cut out the silver parts around the shoes and paint them silver.
Attach the silver parts.
We will create the gear-like part on the heel.
After attaching the gear-like parts, the shoe part is complete.
This is what it looks like when you put it on a doll.
It's finally finished! The production period was 90 days in total. Thank you for your hard work!
(Photobook)
 The customer requested that we use a "glossy material," so we chose this fabric.


